2018年3月19日 星期一

Sysprep 執行時出現 “嘗試對電腦執行 sysprep 時發生嚴重錯誤”

使用 sysprep 工具來一般化映像檔時,sysprep 將刪除所有特定於系統的資訊並重置電腦。電腦在下次重新開機時,可以通過全新體驗 (OOBE) ,將計算機重新啟動到Windows歡迎模式。“歡迎使用Windows”使最終用戶能夠自定義其Windows操作系統,創建用戶帳戶,命名計算機和其他任務。

而 “一般化” 選項會刪除Windows安裝中的唯一的 安全性識別碼 security ID (SID),清除任何系統還原點,並刪除事件日誌;這個動件可使你在不同的電腦上重新使用該映像檔。下次啟動Windows映像時,將重新產生新的 security ID (SID)。


但是 sysprep 工具執行是有次數(3次)限制的,達到限制次數時,執行 sysprep 將會出現錯誤訊息:“嘗試對電腦執行 sysprep 時發生嚴重錯誤”


此時你可以執行以下三個動作

  1. 修改機碼
    • HKEY_LOCAL_MACHINE\SYSTEM\Setup\Status\SysprepStatus\
      將GeneralizationState 改為7


  2. 刪除 Log
    • 將 C:\Windows\System32\sysprep\Panther 目錄下的檔案刪除
    • 刪除前次執行產出的檔案
    • 將 C:\Windows\System32\sysprep\ 目錄下的Sysprep_succeeded.tag檔案刪除(如果有被留下來)


執行上述修改後再次重啟電腦,完成重啟後即可再次執行sysprep

2018年3月16日 星期五

iOS APP 調用App Store 評論與評分 方式

如果你的 iOS APP 需要使用者在APP 使用後,可在APP中幫你的APP執行 "評論與評分",你可以使用以下方法

方法一、(更新 僅試用iOS 10(含)以前的版本)

itms-apps://itunes.apple.com/WebObjects/MZStore.woa/wa/viewContentsUserReviews?type=Purple+Software&id=appleID

如果你的 appleID 為 123456789,範例如下

itms-apps://itunes.apple.com/WebObjects/MZStore.woa/wa/viewContentsUserReviews?type=Purple+Software&id=123456789

注意:
1. appleID 是iTunes Connect 當你提交 APP 時iTunes Connect 自動產生並指定給 App 的 ID,這個appleID是該APP在 apple的唯一的ID。
2. 這個方法在 iOS 11 會出現 “無法連接App Store” 的情形,原因是App Store於 iOS 11 改版了,但如果你使用的是 iOS 10(含)以前的版本,這個連結仍可使用

方法二、

iOS 11 如何調用APP Store 的 評論與評分

itms-apps://itunes.apple.com/cn/app/idappleID?mt=8&action=write-review

如果你的 appleID 為 123456789,範例如下

itms-apps://itunes.apple.com/cn/app/id123456789?mt=8&action=write-review

2017年10月23日 星期一

遠端桌面連線無法連上 Windows 10 / Windows Server 2016 / Windows Server 2019,出現"無法繼續連線,因為未啟用驗證,而遠端電腦要求您必須啟用驗證才能連線"的錯誤訊息

2022/06/07 更新

因要管理的Server 很多, 已經很習慣使用 Remote Desktop Organizer 來連線
當連線到 Windows 10 / Windows Server 2016 / Windows Server 2019 時卻出現了問題

"無法繼續連線,因為未啟用驗證,而遠端電腦要求您必須啟用驗證才能連線"
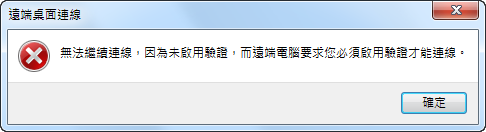


以往遇到這個情形只需採用以下的步驟
  1. 前往控制台(Control Panel)
  2. 選擇 系統及安全
  3. 點選 系統 à 允許遠端存取,取消勾選 僅允許來自執行含有網路層級驗證之遠端桌面的電腦進行連線(建議)(N)\
  4. 儲存後重啟該電腦

可是當你要用連線的遠端環境安裝的是Windows 10 、 Windows Server 2016 及 Windows Server 2019 ,上述方式的修改並無法解決這一個問題。
必須從註冊檔做修改:

1.          開啟 RegEdit
2.          找到 Key : HKEY_LOCAL_MACHINE\SYSTEM\CurrentControlSet\Control\Terminal Server\WinStations\RDP-Tcp
3.          SecurityLayer 預設值 2 修改為 0

4.          儲存後重啟該電腦


完成修改即可正常的使用了
P.S. 1. 完成第一個修改後,可在 Windows 7 中使用預設的 "遠端桌面連線"連線到 Windows Server 2016 / Windows Server 2019。
       2. Windows Server 2019 也有相同問題,同樣依上述方式調整。


Security levels description:

Security Layer 0 – With a low security level, the remote desktop protocol is used by the client for authentication prior to a remote desktop connection being established. Use this setting if you are working in an isolated environment.
Security Layer 1 – With a medium security level, the server and client negotiate the method for authentication prior to a Remote Desktop connection being established. As this is the default value, use this setting only if all your machines are running Windows.
Security Layer 2- With a high security level, Transport Layer Security, better knows as TLS is used by the server and client for authentication prior to a remote desktop connection being established.